A worn-out patio feels like a missed opportunity. Whether you’re looking to expand your outdoor living space, refresh a tired backyard, or tackle your first landscape project, Home Depot patio pavers offer a practical and cost-effective solution. Home Depot stocks an impressive range of materials, from budget-friendly concrete options to premium stone pavers, making it easier than ever for homeowners to find exactly what fits both their design vision and their skill level. This guide walks you through selecting, measuring, and installing pavers like a seasoned DIYer, covering the real-world decisions you’ll face along the way.
Table of Contents
ToggleKey Takeaways
- Home Depot patio pavers offer a cost-effective solution with wide material options ranging from budget-friendly concrete to premium stone, plus in-store availability and design support for DIY projects.
- Concrete pavers cost $0.50–$1.50 per unit and last 20–25 years, while stone pavers ($2–$5+ per unit) provide superior aesthetics and 30+ years of durability with proper sealing.
- Accurate measurement is critical—calculate total square footage, add 10% for cuts and breakage, and account for at least 1/8 inch per linear foot slope for drainage to prevent pooling.
- Proper base preparation with 4–6 inches of compacted gravel and 1 inch of leveling sand is essential to prevent settling and uneven surfaces caused by rushing this step.
- Permeable patio pavers reduce stormwater runoff and benefit the environment, though they require correct gravel base and joint spacing to function as designed.
- Monthly sweeping, annual pressure washing (low-pressure on concrete, up to 3000 PSI on stone), and resealing stone pavers every 2–3 years extend patio life and maintain appearance.
Why Choose Home Depot Patio Pavers for Your Outdoor Project
Home Depot’s patio paver selection stands out for breadth, availability, and practical support. Unlike specialty landscape suppliers that may require contractor accounts or ship long-distance, Home Depot makes it easy to browse, compare, and load materials yourself. Most Home Depot locations stock common sizes in-store, 6×6 inch, 8×8 inch, and 12×12 inch concrete pavers are standard, while less common materials like permeable pavers or large-format porcelain can be ordered for pickup or delivery.
Beyond inventory, Home Depot offers predictable pricing, frequent sales on seasonal outdoor products, and straightforward return policies if you miscalculate your material needs. The retailer’s design advisors can also help estimate paver quantities based on your square footage. For first-time patio builders, this accessibility removes a major barrier. You’re not guessing whether a supplier will have stock in three months: it’s available now.
Types of Patio Pavers Available at Home Depot
Home Depot stocks several paver categories, each with distinct durability, appearance, and installation requirements. Understanding the differences helps you match material to your climate, foot traffic, and aesthetic.
Concrete and Stone Pavers
Concrete pavers are the workhorse option, affordable, widely available, and straightforward to install. Standard concrete pavers run $0.50 to $1.50 per unit, depending on size and finish. They come in neutral tones (gray, tan, charcoal) and textured or smooth finishes. Expect concrete pavers to last 20–25 years in moderate climates before settling or surface wear becomes noticeable.
Stone pavers, travertine, granite, slate, and bluestone, command higher prices ($2 to $5+ per unit) but offer superior aesthetics and longevity (30+ years). Travertine and slate are softer and more prone to staining in freeze-thaw climates, so confirm your regional suitability before purchasing. Stone requires more careful handling during installation due to weight and irregularity, and sealing is often recommended to prevent water absorption and weathering.
Permeable and Eco-Friendly Options
Permeable pavers let water drain through joints into a gravel base, reducing runoff and benefiting local stormwater systems. Materials include permeable concrete, recycled plastic composites, and porous asphalt. Costs range from $1 to $3 per unit, slightly higher than standard concrete but offset by reduced grading work and drainage infrastructure.
If local codes require stormwater management or you’re building on clay soil with poor drainage, permeable pavers are a smart choice. They require a 4–6 inch gravel base and proper joint spacing to function correctly, cutting corners undermines their environmental benefit and performance. Home Depot stocks several permeable brands: ask staff whether they’re certified for your area’s drainage standards.
Measuring and Planning Your Patio Space
Measuring incorrectly, or not at all, is the fastest way to end up short on materials or with a wobbly patio. Take time upfront.
Start by measuring your patio footprint length and width in feet, then multiply to get total square footage. If your space is irregular (L-shaped, curved edges), break it into rectangles and add the areas together. Add 10% to your material estimate to account for cuts, breakage, and future repairs. A 100-square-foot patio so requires roughly 110 square feet of pavers.
Next, account for slope for drainage. Patios should slope at least 1/8 inch per linear foot away from buildings, that’s a barely perceptible slope that prevents water pooling. If you’re replacing an existing patio, measure the current slope with a 4-foot level and try to match it.
Measure and mark any obstacles: garden beds, trees, downspouts, utility lines. Contact your local utility locating service (call 811 in the US) before digging to identify buried gas, electric, or water lines. It’s free and legally required in most jurisdictions. Finally, visit Home Depot with your measurements and paver size in hand. Staff can calculate the exact unit count and help you spot any gaps in your plan before you load the truck.
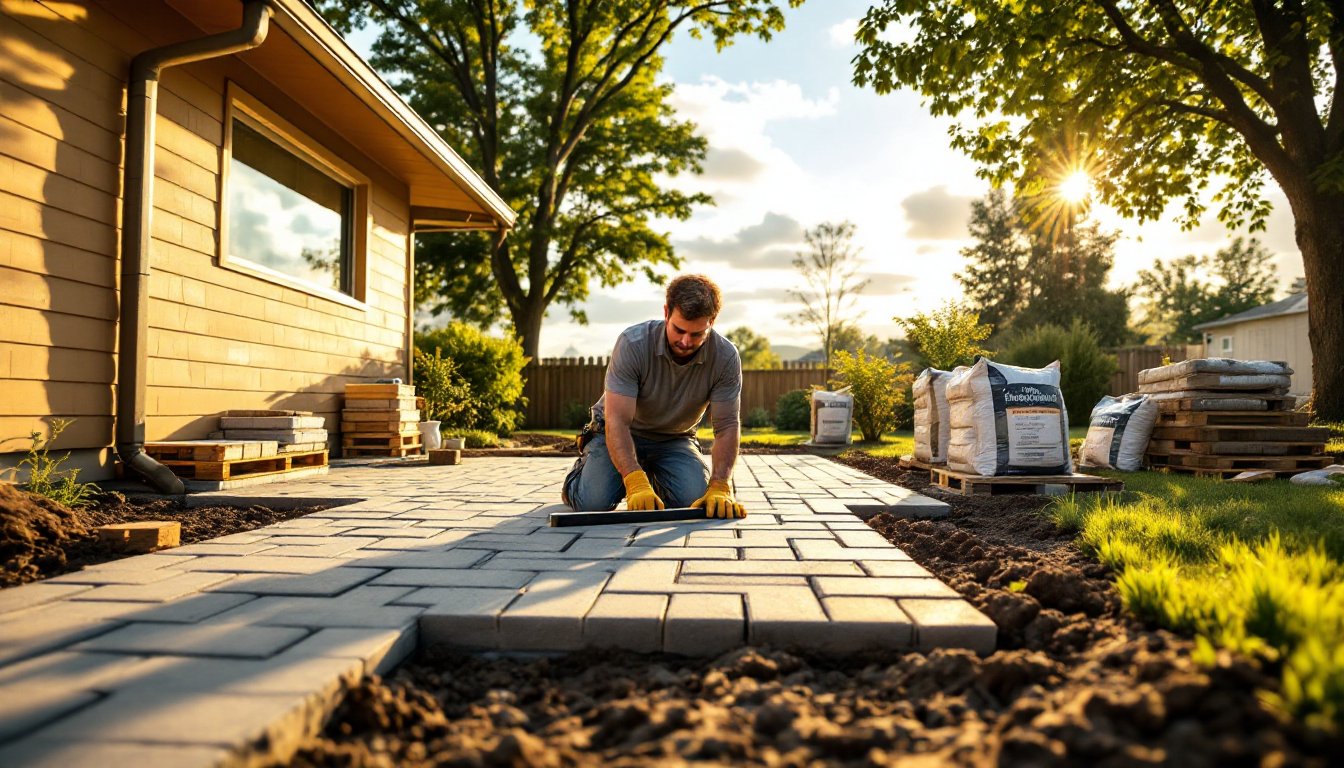
Installation Tips for DIY Success
A successful patio installation hinges on prep work. Rushing the base is the most common mistake homeowners make.
Preparation and Base Layer:
Excavate your patio area to a depth of 4–6 inches (concrete pavers) or 5–7 inches (stone). Remove grass, roots, and debris, then compact the soil with a hand tamper or plate compactor. Poorly compacted soil shifts under foot traffic, causing pavers to settle unevenly.
Add a 4-inch layer of compacted gravel or crushed stone as your base. This provides drainage and stability. Tamp it firmly after spreading. If you’re laying permeable pavers, use drainage gravel throughout: if standard concrete, coarse gravel is fine. Add a 1-inch layer of polymeric sand or stone dust on top for leveling. Wet the polymeric sand slightly, then rake it level. This is your working surface, take your time.
Layout and Cutting:
Dry-lay your pavers (arrange them without adhesive) to plan cuts and check fit before bed them permanently. Mark cut lines with chalk, then use a circular saw with a masonry blade, angle grinder with a diamond blade, or wet saw for clean cuts. Wear safety glasses and a dust mask, masonry dust contains silica, which is harmful to lungs with repeated exposure. If cuts are extensive, rent a wet saw: it’s worth the $30–$50 for cleaner edges and fewer blade replacements.
Bed pavers firmly into the sand or adhesive. Use a rubber mallet to tap each paver until it’s flush and level with neighbors. Check frequently with a level to avoid high spots and low points.
Jointing:
Once all pavers are set, sweep polymeric sand into joints and mist with water (don’t saturate). The sand hardens as it dries, locking pavers in place. This step is non-negotiable: skipping it leaves pavers loose and prone to shifting. Let the patio cure for 24–48 hours before heavy foot traffic.
Maintenance and Long-Term Care for Your Pavers
Proper maintenance extends paver life and keeps your patio looking fresh. The best ongoing investment is preventive care.
Sweep or blow debris off your patio monthly to prevent organic matter (leaves, moss) from accumulating in joints and trapping moisture. In fall, step up frequency to handle leaf drop. Pressure wash annually with a low-pressure setting (1500 PSI max) on concrete and up to 3000 PSI on stone: high pressure erodes joints and can chip edges.
For staining, tree sap, rust, or algae, address it promptly. Mix a mild detergent with water and scrub: for stubborn stains, a 1:1 vinegar-water solution works on mineral deposits. Avoid bleach on stone pavers, as it can discolor and weaken the material. Reseal stone pavers every 2–3 years and permeable pavers if recommended by the manufacturer: sealer reduces absorption and makes cleaning easier.
Weed growth in joints is inevitable: pull them regularly or spot-spray with herbicide before they root deeply. Reapply polymeric sand to gaps every 2–3 years if water and foot traffic wash it away. Resources like home improvement planning guides offer seasonal maintenance checklists that keep you organized.
If a paver cracks or breaks, the repair is straightforward. Pop out the damaged unit with a pry bar, remove old sand and adhesive, and replace with a new paver. Edge pavers near garden beds or pools may shift if soil erodes beneath them: reset them with fresh base material and tamper. Regular inspection catches these issues early.