Home remodeling doesn’t always require gutting an entire room or draining your savings. Whether you’re facing a dated kitchen, a cramped bathroom, or simply tired of staring at the same walls, strategic updates can completely transform how your space looks and functions. The best home remodel projects balance ambition with practicality, tackling what matters most while knowing when to call in professionals. This guide walks you through the essential steps, from initial planning to real-world examples, so you can approach your project with confidence and avoid the common pitfalls that derail homeowners.
Table of Contents
ToggleKey Takeaways
- Home remodel projects require solid planning before starting—identify problems, prioritize by impact on daily life, and build a visual reference file to keep your vision grounded and aligned with contractor expectations.
- Budget 15-20% contingency buffer into your total home remodel cost to cover hidden issues like foundation cracks, mold, or electrical code violations that commonly surface mid-project.
- Kitchen and bathroom remodels deliver the highest return on investment, but always address structural and water damage issues first, then add aesthetic upgrades like new fixtures, paint, and lighting.
- Know your DIY limits: painting and demolition are safe, but anything involving permits, electrical, plumbing, load-bearing walls, or hazardous materials requires licensed professionals to ensure code compliance and safety.
- Proper surface preparation—sanding before refinishing, sealing subflooring before tiling, priming before painting—prevents costly failures and should consume 40% of your project timeline.
- Phase your upgrades strategically by prioritizing high-impact spaces like primary bathrooms and kitchens first, then tackle lower-priority areas like guest rooms and bedrooms for sustained project momentum and satisfaction.
Planning Your Home Remodel: Foundation for Success
Before you buy a single fastener or paint can, you need a solid plan. Most failed remodeling projects stumble because homeowners skip this step entirely, they get excited and start demolition without knowing what comes next.
Start by identifying what’s broken, outdated, or functionally wrong. Is your kitchen too cramped? Does your bathroom flood when you shower? Are floors damaged or stained beyond repair? Write these problems down. Then step back and prioritize: which issues affect daily life the most? A leaky faucet matters less than a rotted subfloor.
Next, research comparable projects online and in your neighborhood. Look at finished projects similar to yours, note what you like and dislike, and start building a visual reference file. This keeps your vision grounded and helps contractors understand what you want.
Setting a Realistic Budget and Timeline
Budget and timeline are inseparable, both require ruthless honesty. Most homeowners underestimate costs by 20-30%, especially when unexpected problems surface. A foundation crack hidden behind a wall, hidden mold, or electrical code violations discovered mid-project will blow your budget if you haven’t planned for contingencies.
Allocate 15-20% of your total budget as a buffer for surprises. If your kitchen remodel is $25,000, set aside an extra $3,750-$5,000. This isn’t pessimism: it’s experience talking.
Timeline depends on scope and whether permits are required. A small bathroom refresh, new tile, vanity, fixtures, might take 2-3 weeks if you or a contractor are working full-time. A full kitchen remodel with structural changes easily stretches 8-12 weeks. Building permits, inspections, and material lead times add time you can’t control. Be explicit: ask contractors “When do you actually start, and when are you genuinely done?” Vague answers are red flags.
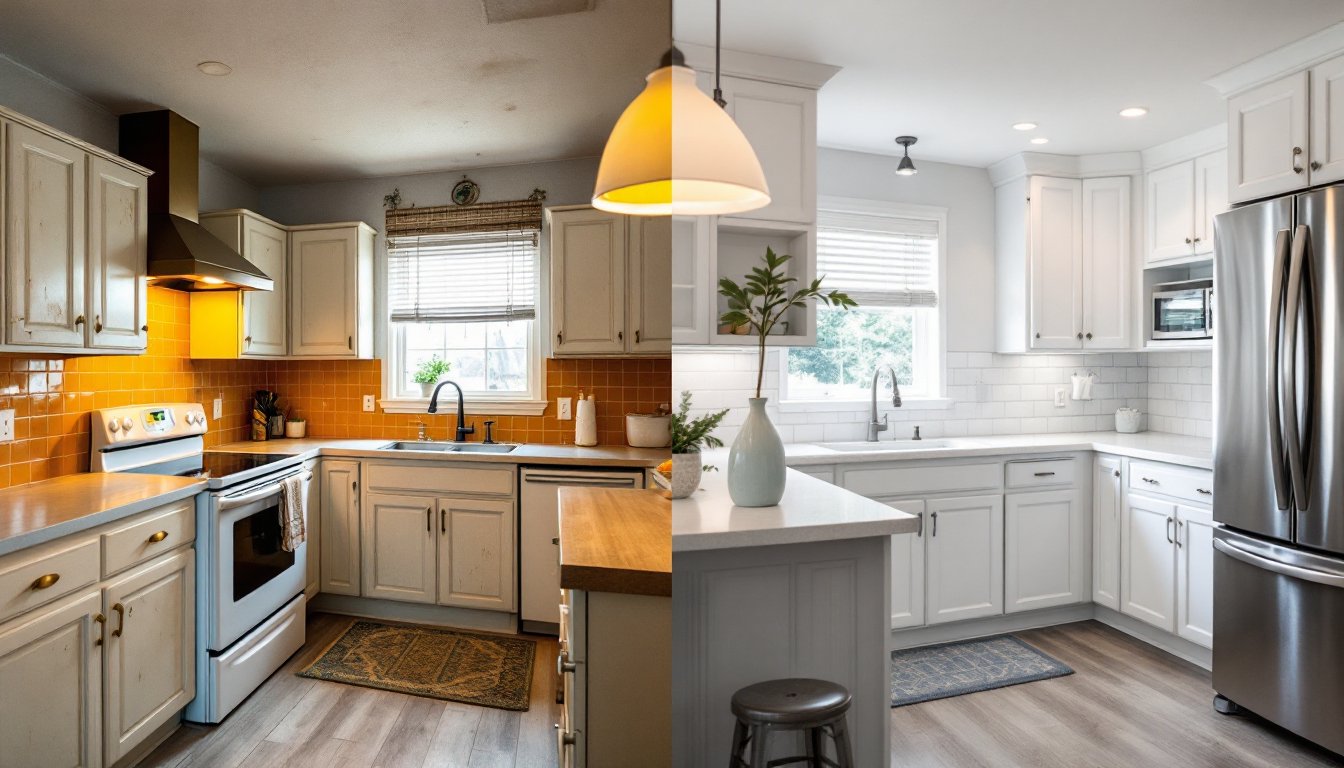
Kitchen Remodels: From Dated to Stunning
Kitchens are where remodeling pays back in both enjoyment and resale value. But they’re also complex, plumbing, electrical, gas lines, and structural concerns intersect here.
Start with what functions poorly. Cramped countertops, poor lighting, cabinet failures, and outdated appliances are common complaints. Before you redesign the whole layout, ask: can I solve this by relocating or adding storage, upgrading lighting, and refreshing the finish?
A cabinet refinish or reface costs $5,000-$10,000 and looks dramatically better than original stained oak. Swapping hardware, adding open shelving, and painting gives personality without tearing into walls. New countertops and backsplash, even modular laminate instead of custom stone, transform the visual impact for $3,000-$7,000.
If you must move plumbing or electrical, or relocate an island, get a contractor involved. These changes require permits, inspections, and code compliance. The electrical work alone needs a licensed electrician in most jurisdictions (required by code, not just smart).
Appliances deserve careful consideration. A refrigerator, range, and dishwasher alone account for 30-40% of a mid-range kitchen budget. Buy for function and reliability, not just aesthetics. Stainless steel looks modern but requires constant wiping. Black or white finishes hide fingerprints better and cost less.
Lighting transforms a kitchen more than many realize. Under-cabinet LED strips ($200-$400 installed) make work surfaces visible and create ambiance. Adding a new ceiling fixture and pendant lights over an island ($600-$1,500) elevates the whole room. These upgrades are electrician work, usually 4-6 hours of labor.
Bathroom Transformations: Spa-Like Upgrades on Any Budget
Bathrooms offer the fastest visual transformation per dollar spent, but water damage and ventilation issues lurk beneath the surface. Before you chase spa vibes, fix the fundamentals.
Ventilation is non-negotiable. A bathroom without proper exhaust runs into mold, mildew, and moisture damage. Your exhaust fan should move air directly outside (not into an attic), sized for the room’s square footage, and run for 20-30 minutes after every shower. If yours vents into the attic or basement, this becomes an unexpected project, hire an HVAC tech ($300-$800) to run new ductwork to the exterior.
Water damage shows up first in caulk, grout, and subflooring. A crumbling grout line between tiles usually means water’s getting behind, not just cosmetic. Remove and re-grout damaged areas ($15-$25 per square foot, DIY or pro). If subfloors are soft or discolored, the damage is deeper: expect $1,500-$4,000 to cut out and replace rotted material plus new underlayment.
Once the structure is sound, transform visually. A fresh coat of paint ($300-$600), new lighting ($400-$800), and updated mirrors ($200-$500) cost little but yield maximum impact. From builder-grade fixtures to spa-like features, tile and fixtures can vary wildly in price. Porcelain tile runs $1-$8 per square foot installed: natural stone, $8-$20+.
A new vanity, toilet, and faucet might cost $1,500-$3,000 installed, or $400-$800 if you’re comfortable with DIY plumbing basics (though shutoff valves, P-traps, and securing to studs demand precision).
Shower and tub updates range widely. Refinishing an existing tub ($300-$600) buys time. Replacing it with a soaking tub or walk-in shower runs $2,000-$6,000+ installed. Tile work in a shower demands waterproofing membrane and proper slope, not ideal for first-timer DIYers.
Living Spaces and Bedrooms: Maximizing Impact with Smart Updates
Living rooms and bedrooms rarely need structural work, so you can focus on aesthetic transformation and functional improvements. These rooms reward smart material choices and strategic updates.
Flooring often defines a room’s character. Replacing carpet or old tile is heavy lifting but transforms everything. Luxury vinyl plank (LVP) mimics wood or stone, costs $2-$5 per square foot installed, and tolerates moisture and scratching better than laminate. Real hardwood runs $8-$15+ per square foot: engineered hardwood splits the difference ($4-$10).
If you’re keeping existing flooring, paint walls and add molding. Fresh paint ($1,500-$3,000 for most homes, done by a pro) is the quickest makeover. Trim work, baseboards, crown molding, door casings, adds polish. Painting trim usually costs $15-$30 per linear foot installed.
Lighting anchors ambiance. A chandelier or statement pendant replaces a basic ceiling fixture ($200-$1,000+), and adding dimmer switches ($50-$150 per switch) gives you control. Wall sconces flank mirrors or art ($100-$400 each installed).
Built-in shelving or custom cabinetry ($2,000-$6,000+) adds storage and character, though both require carpentry skills or professional installation. Stock shelving, floating shelves, and bookcases ($300-$1,500) deliver similar impact at a fraction of the cost.
Windows matter too. New windows aren’t cheap ($300-$800 per unit installed), but they improve energy efficiency and transform curb appeal. Interior updates like new curtain rods, upgraded hardware, or plantation shutters ($100-$800 per window) refresh a room instantly.
DIY vs. Professional Help: Knowing What You Can Handle
The line between “I can do this” and “I need a pro” isn’t arbitrary, it’s about safety, code compliance, and genuine skill. Be honest with yourself.
Safe DIY tasks: Painting, simple demolition and debris removal, installing shelving or mirrors, replacing cabinet hardware, caulking, grouting, installing vinyl flooring, painting trim, and basic drywall patching.
Get a professional: Anything involving permits, load-bearing walls, plumbing, electrical, HVAC, structural changes, roofing, or asbestos. A structural engineer or architect should evaluate load-bearing decisions. Local electrical codes require licensed electricians for new circuits and outlets in most jurisdictions (not just best practice, it’s law). Plumbing code violations create leaks and liability.
Hazardous materials, lead paint (homes pre-1978), asbestos (older insulation, popcorn ceilings), and mold, require professional remediation. DIY removal spreads contaminants: licensed specialists contain and dispose safely.
You can finish work professionals start. A tile guy sets the base: you grout and seal. An electrician runs new circuits: you paint the wall. This hybrid approach saves labor without compromising safety.
Get multiple bids for professional work. Three quotes from licensed, insured contractors reveal market rate and let you compare scope and timeline. Ask references and check reviews, but remember: the cheapest bid is often the slowest or lowest quality.
Learning from Real Projects: What Works and What to Avoid
Real-world remodeling stories reveal what trips up homeowners and where smart choices pay off.
Failed projects often share a pattern: insufficient prep work. Painting over unprimed drywall leads to peeling. Tiling over wet subflooring causes mold. Refinishing cabinets without sanding the existing finish causes the new coat to chip. Proper surface prep, sometimes the most unglamorous part, prevents failures. Spend 40% of your project time prepping: it pays back tenfold.
A common mistake is underestimating labor cost and timeline. Material costs are predictable: labor varies wildly by region and contractor. What costs $8,000 in Des Moines might cost $15,000 in San Francisco. If a contractor says “two weeks,” ask what stops delays (material delivery? inspections? weather?). Reality usually stretches timelines.
Another pitfall: chasing trends. The white subway tile and gray-tone-everything aesthetic felt timeless five years ago: today it’s dated. Choose classic bones, cabinet style, tile layout, color palette, and refresh with cheaper elements (hardware, paint, lighting) when trends shift.
Homeowners who plan upgrades in phases, finishing the most-used or most-visible spaces first, report higher satisfaction. A bedroom remodel can wait: your primary bath can’t. Living rooms beat guest rooms in priority.
Real before-and-after projects show that structural fixes often come before aesthetic updates. Properly handling water damage, settling foundations, or electrical hazards prevents future costs and headaches. Budget for surprises during demo: expect to find something you didn’t plan for, and be ready to decide: fix it now or live with it?